Showing posts with label Time Saving Tips. Show all posts

Saturday, March 27, 2010

Paprika Chicken with Sour Cream Gravy

This recipe had been on my to-make list literally for years. For some reason, I shied away from making it. I'm pretty sure it's because I have a subconscious prejudice against Campbell's soup recipes. However, my current arsenal of quick recipes is dwindling so I decided to give it a shot. I'm so glad I did - this was delicious! The chicken had a great seasoning combination and it paired really well with the gravy. As an added bonus, it took less than 20 minutes to make, start to finish.


Paprika Chicken with Sour Cream Gravy
Recipe from Campbell's Kitchen
Serves 2
Cook & Prep Time - 15-20 minutes

INGREDIENTS
1/2 cup flour
2 tsp paprika
1 tsp garlic powder
1 tsp pepper
1 tsp cayenne pepper
2 boneless skinless chicken breasts
2 tsp butter
1 tsp oil
1 can Cream of Chicken soup (try to get the low sodium healthy request stuff)
1 cup (8 oz) sour cream (low fat works well)
salt & pepper, to taste

DIRECTIONS
Combine the flour with the paprika, garlic powder, cayenne pepper, and black pepper.

Melt butter in a medium skillet over medium heat and combine with the oil.

Pound the chicken a bit. Pat dry. Dredge in the flour mixture and cook the chicken until cooked through, about 5-7 minutes per side.

Meanwhile, in another skillet or saucepan, combine the soup & sour cream. Bring to a low boil. Season with salt & pepper. (The original recipe said to do this in the same pan as you that you used to cook the chicken after you cook it, but I did it in a separate pan to save time).

Serve the sauce over the chicken. I served it with egg noodles, but I can imagine it would also be good with rice or a green vegetable.

Sunday, September 21, 2008

Peanut Butter Brownies

I love brownies. Really love them. Not much can beat a nice, fudgy brownie. Well.... except a peanut butter brownie. I've made a few recipes for peanut butter brownies over the past year and have been generally satisfied with each recipe I've tried. Given my recent desire for peanut butter brownies, but lack of any real desire to bake, I decided to get creative and utilize what was, until about a year ago, my arch nemesis: the boxed brownie mix.

I almost feel like I shouldn't blog about these. However, notice I said almost. In the end, I've decided that these are worthy of a blog post because they're so good and so easy.


Peanut Butter Brownies

INGREDIENTS
1 box brownie mix (we like Betty Crocker Fudge Brownies)
2/3 cup peanut butter

DIRECTIONS
Prepare brownie batter according to directions and pour into a 9 x 13 pan (or 8 x 8 if you like them really thick).

Meanwhile, melt the peanut butter over medium-low heat.

Once peanut butter is melted, pour it on top of the brownie batter and use a knife or rubber scraper to swirl the peanut butter around the top and give it a nice marble look.

A visual, in case my description of the technique was confusing...

Bake for the amount of time indicated on the brownie mix box (mine was about 25 min).

Wednesday, August 13, 2008

Laughing Cow Chicken

I'm making a sincere effort to clean out the kitchen. We're moving soon, and I don't really want to haul a bunch of food over to the new place. It'll do us good, anyway. I'm discovering we have a lot of random stuff. When I was at work today, I wanted something with chicken. So, I got home and started looking through the kitchen. Chicken breasts? Check. What can I do with them.... stuff them, I thought. The Laughing Cow wedges I had sitting in the fridge looked like they were eager to stuff some chicken breasts. So there we go... now what exactly to do with them? I decided to lightly bread them, pan fry them a little, then finish them off in the oven. I'm quite proud of the results. We both gave this rave reviews.


Laughing Cow Chicken
Serves 2

Total Cook & Prep Time - 45 min


INGREDIENTS
2 chicken breasts, pounded thin
4 wedges Laughing Cow Garlic & Herb cheese, softened
cooking spray
1/2 cup bread crumbs
dash dried parsley flakes
dash grated Parmesan cheese
Olive oil

DIRECTIONS
Lay each chicken breast flat. Spread 2 wedges of cheese on each (feel free to adjust for your size chicken breasts or desired level of cheese). Roll up and seal with toothpicks.

Meanwhile, mix together the bread crumbs, parsley flakes, and Parmesan cheese in a shallow dish.

Spray the chicken rolls with cooking spray and dredge them in the breadcrumb mixture. I found it easiest to do this by spraying the tops while sitting on the tray I rolled them on, then dipping that half in bread crumbs, then spraying the other side and rolling the chicken over. I'm sure you could do a regular breading technique, but this was much easier and quicker.

Heat a couple tsp olive oil in a medium skillet over medium heat. Add the chicken and sear on all sides. Transfer to a baking dish or cookie sheet and bake 15-25 min, depending on the size of your chicken breasts and how long you cooked them in the pan. Mine took about 20 min.

Remove toothpicks and serve!

Friday, February 1, 2008

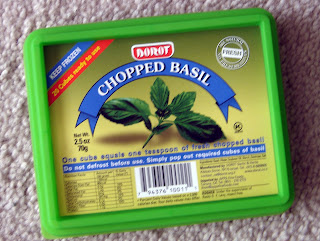
Basil

I love using fresh basil in my cooking, but it always goes bad before I can use it all. In turn, I ed up throwing out way too much basil.

Last time I was at Trader Joe's, I found they had little packets of frozen fresh basil cubes, just like their frozen garlic cubes. I decided to give it a shot. I've been using it in my Italian cooking over the past couple weeks and I can't taste any major differences - and the convenience can't be beat.


You should check it out.

Monday, January 14, 2008

Tip Time

Seeing as I haven't really blogged much lately (excuses will be posted later), I thought I'd sign on and share two of my favorite cooking tips with you.

1. Rotisserie chickens make the best chicken salad
2. Coarsely shredded rotisserie chicken meat makes awesome taco meat.